Watch the Video
Watch our video for a walkthrough of registering with WCOnline and making an online appointment.
Or use the following guide to find a step-by-step walkthrough of navigating our appointment system.
Register with the System
- Navigate to utsa.mywconline.com.
- Click the link to 'Register for an account'.
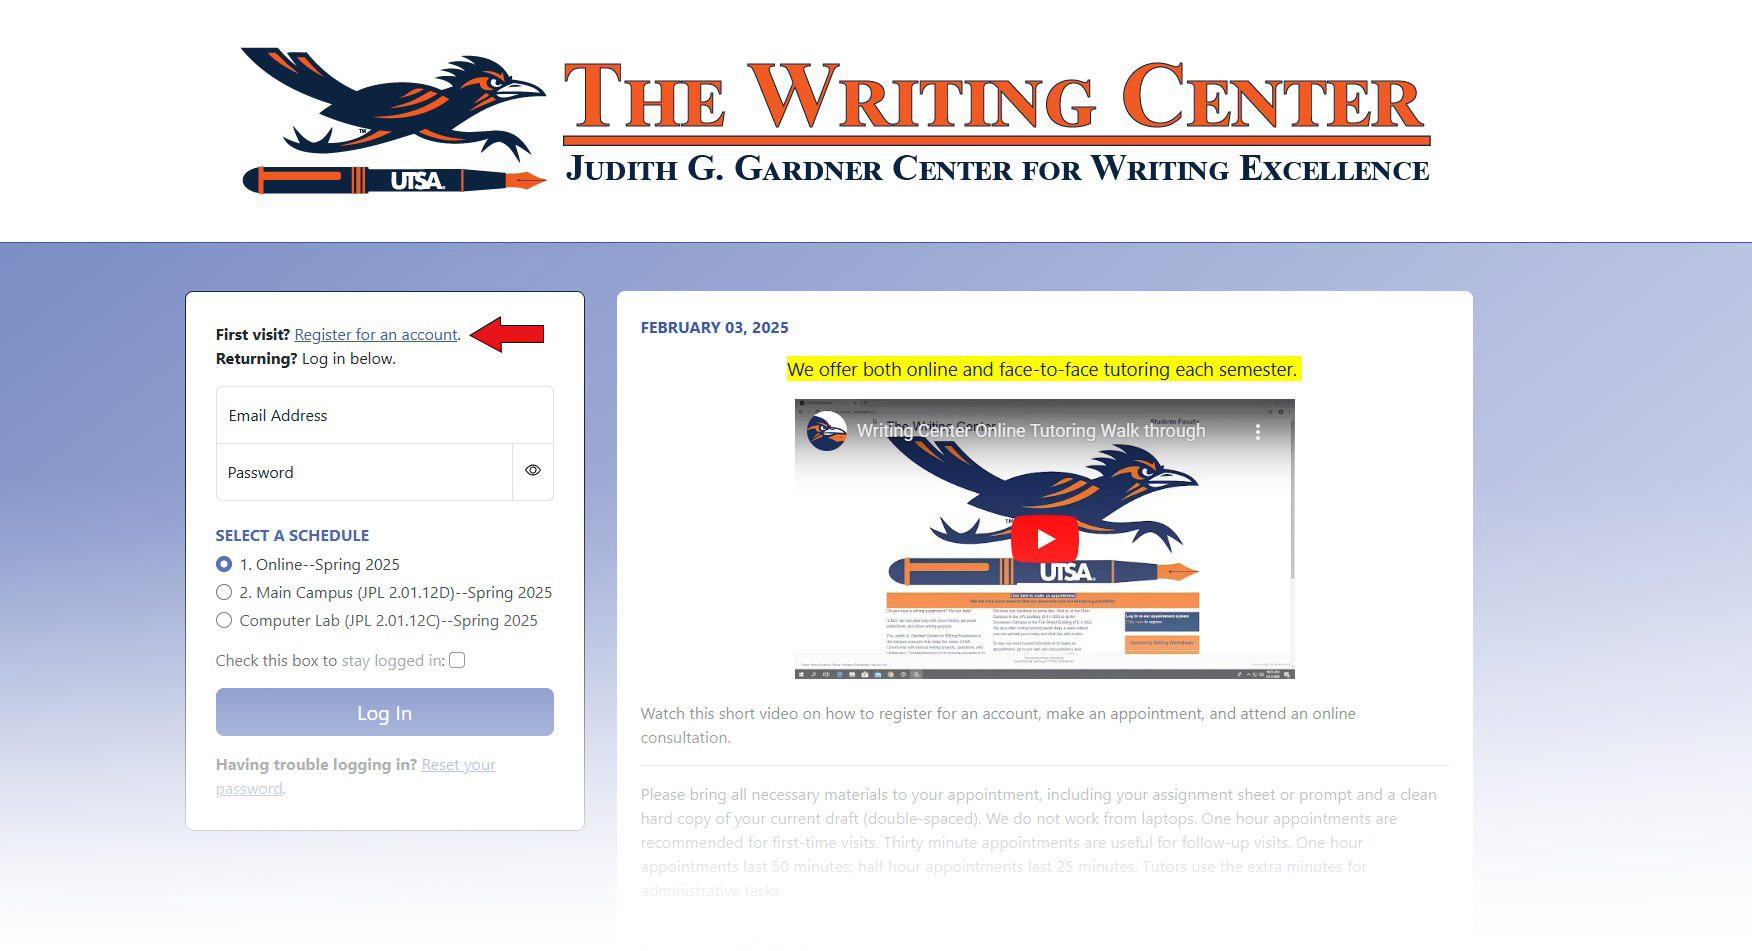
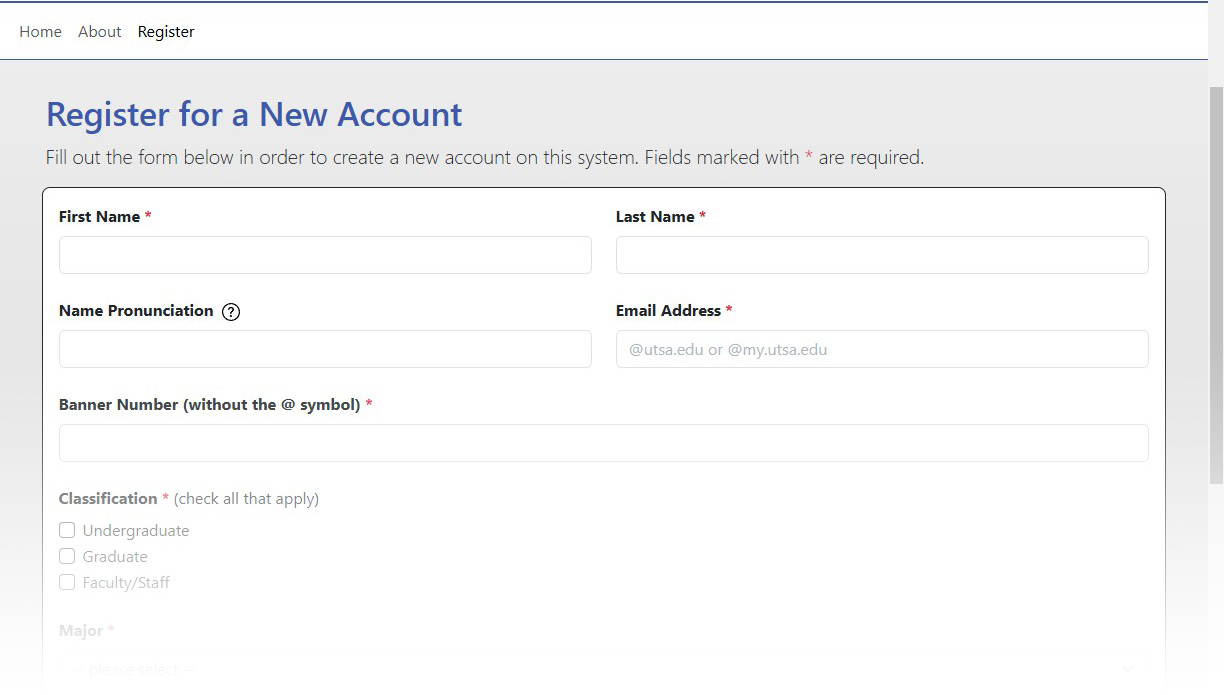
- Fill in the required information designated by the * and click 'save'.
- You are now registered for the appointment system.
- Login with the information you provided in step #3 above.
Choose the right Schedule
- Making an Online Appointment:
- Once you log in, the default schedule should take you to our Online schedule. Just verify that the schedule title begins with '1.Online' and proceed to the next section, 'Make an Appointment'.
- Making an Appointment for our Main Campus location:
- Click on the hamburger menu in the top left-hand side of the screen to open up the navigation menu. Find the area in the navigation pane in the top left marked 'Schedules.'
- Click on the drop down box to the right of 'Schedules.'
- Find the schedule that begins with '2.Main Campus (JPL2.01.12D)' and select it.
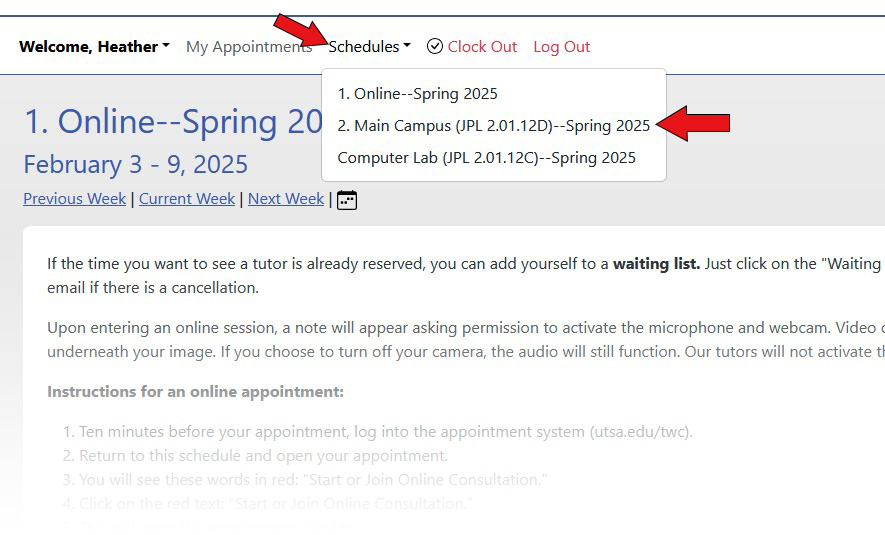
Note: Our Computer Lab schedule is for faculty to reserve the Writing Center Computer Lab to teach a class. Please do not select this schedule to make a tutoring appointment! Doing so will cause your appointment to be canceled and for you to need to reschedule on one of our tutoring schedules.
Make an Appointment
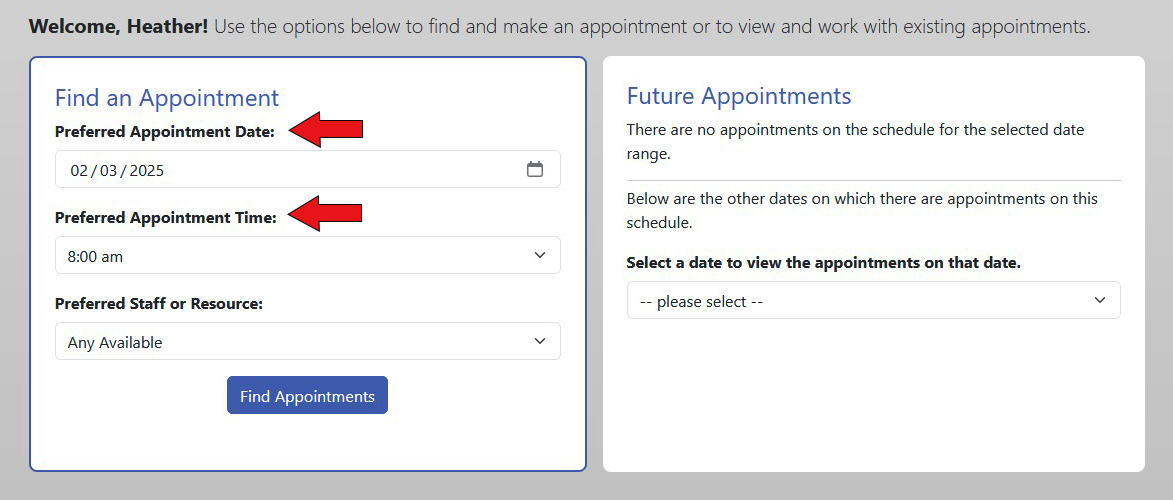
- Once you are on the Schedule that you want to make your appointment, scroll down to the box titled 'Find an Appointment.'
- By default, today's date will be selected under 'Preferred Appointment Date.' Click in the box to type out the date you would like to make an appointment in a mm/dd/yyyy format or else click the calendar icon to drop-down a calendar selector in able to navigate to the right date.
- After selecting a date, click in the box under 'Preferred Appointment Time' and select what time you would like to make the appointment for.
- If you would like to work with a specific tutor, click in the 'Preferred Staff or Resource' box and select the tutor you would like to meet with. If you have no preference, leave the box set to 'Any Available.'
- Now click the 'Find Appointments' button.
Note: The box to the right of the 'Find an Appointment' box will either be called 'Today's Appointments' or 'Future Appointments.' If you have already made an appointment in our system, you can use this box to find it. Or just click the 'My Appointments' tab in the navigation pane.
- You now will be taken to a screen with the results of your appointment search.
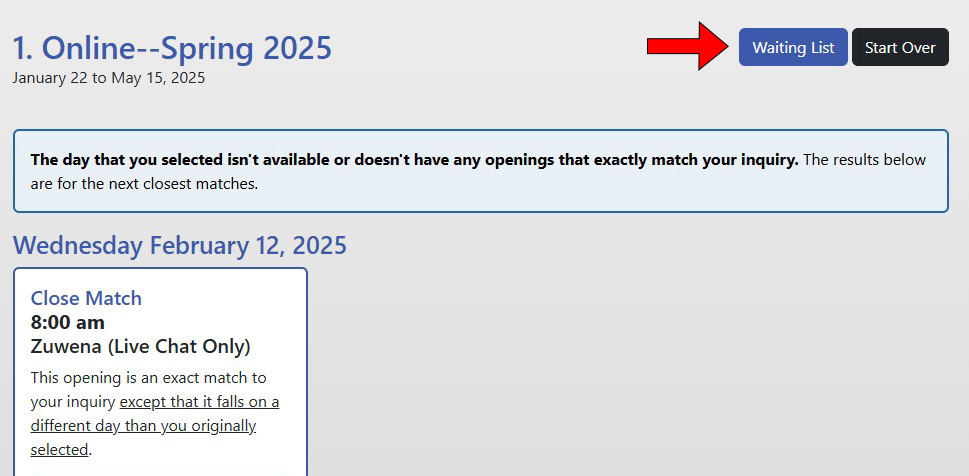
- If there is an exact match for the search criteria you entered, it will be displayed at the top of the results with the tag 'Perfect Match' in green in the top left of the appointment.
- Underneath the 'Perfect Match' appointment section, or if there was not an exact match for your search criteria, the system displays several appointment options that attempt to come close to the criteria you entered that are labeled with the 'Close Match' tag.

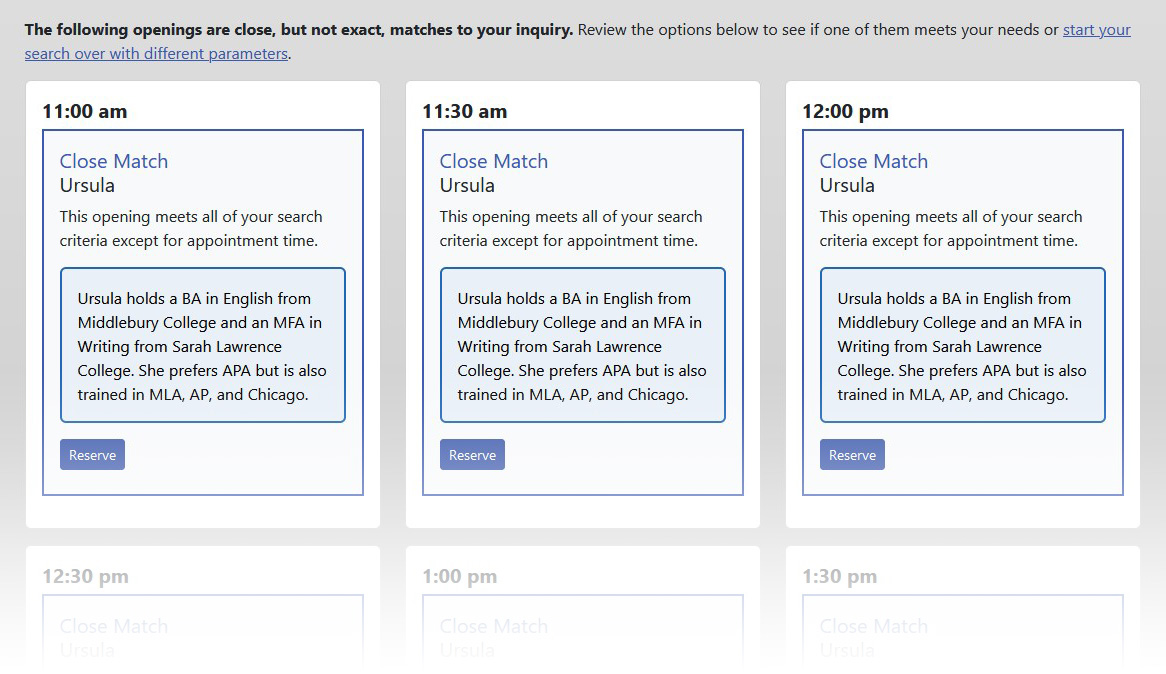
- Once you determine which appointment is best for you, click the blue 'Reserve' button at the bottom left of the appointment card to take you to the 'Create a New Appointment' window.
- In the 'Create New Appointment' window, verify the date and time are correct, then proceed to fill out all of the sections marked with an *.
Note: By default, all appointments are set to one hour in length: 50 minutes for tutoring and 10 minutes for administrative tasks. If you think you need more time than 1 hour, please contact Martha.Smith@utsa.edu for accommodations.
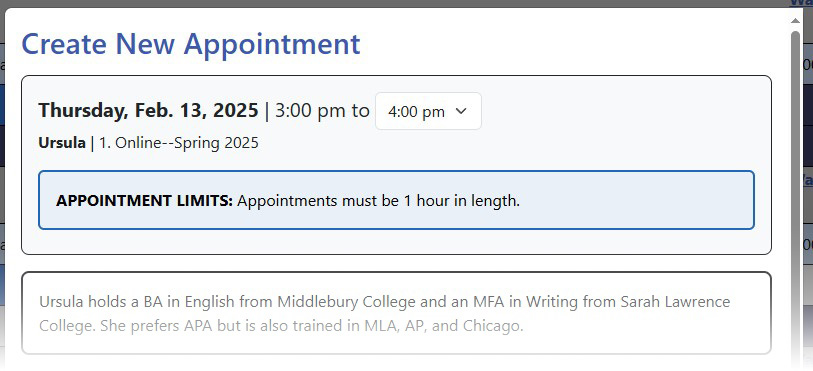
- Toward the bottom of the window there is a section called 'File Attachments' where you could attach your essay in its current form and/or the prompt for the assignment. (For a detailed walkthrough, please see the 'Upload File Attachments' section of this guide.) You do not need to do this now: you CAN come back and upload documents once the appointment has been created.
- When you have completed filling out all of the 'Create New Appointment' fields, click the blue 'Create Appointment' button at the very bottom of the window.

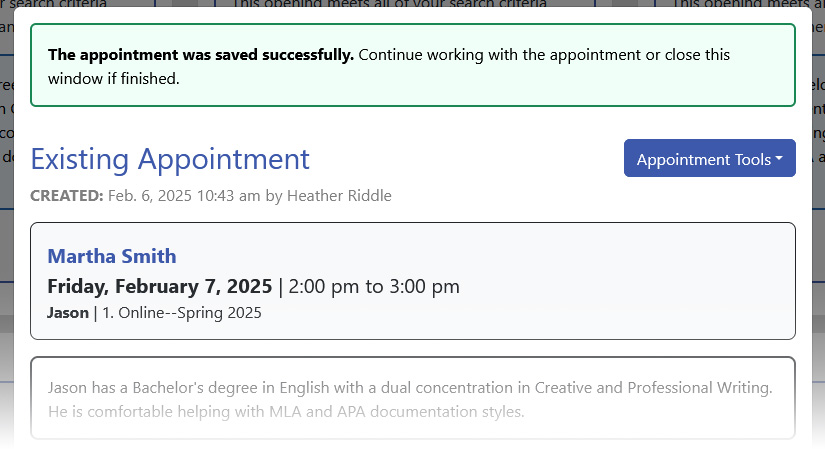
- If there were no issues upon confirmation, a new window will replace the current one titled 'Existing Appointment' and it will have a green box at the top reading 'The appointment was saved successfully.'
- You may now close the window.
Find and Edit your Appointment
- If you need to return to your appointment to edit the details, first log back into our system at utsa.mywconline.com.
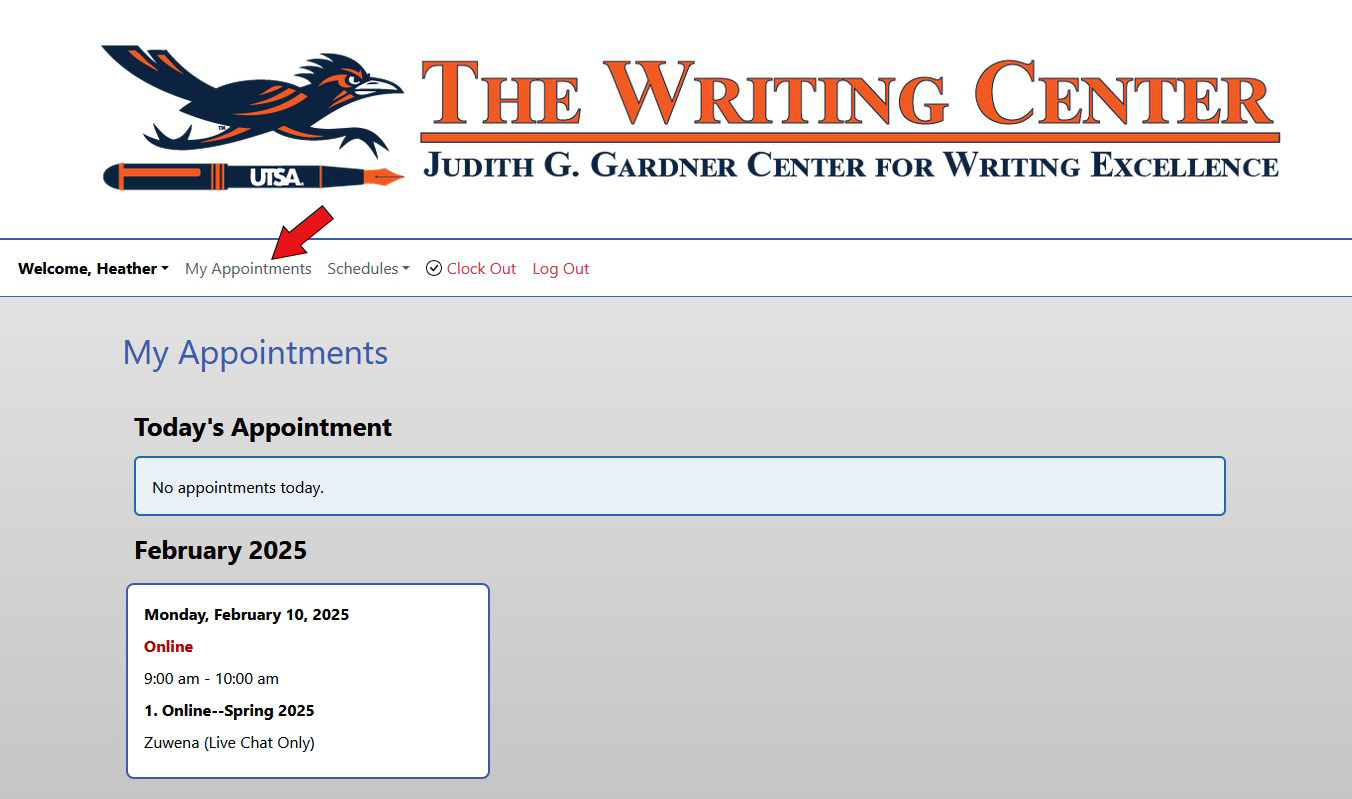
- Once you are logged in, you can find your current appointments by clicking the 'My Appointments' tab on the top left side of the navbar.
- On this page, you will find all of your current and upcoming appointments.
- Click on the appointment card you would like to edit and you will get the 'Existing Appointment' window for that appointment.
- At the very bottom of the window, there should be 5 buttons, click on the blue 'Edit Appointment' button second from the left.

- A new 'Edit Existing Appointment' window will open and allow you to make basic changes to the details of your appointment. We recommend that if you need to change the date or time of your appointment that you cancel it and redo your search for an appointment. (For a detailed walkthrough, please see the 'Cancel an Appointment' section of this guide.)
- Once you have made the necessary changes, confirm your changes by clicking the blue 'Save Changes' button at the bottom of the window.
Upload File Attachments
There are two different ways to upload a file attachment to your appointment. Choose between option 1 and 2 to proceed.
- If you previously logged out of WCOnline:
- Log back into our system at utsa.mywconline.com.
- Navigate to your 'My Appointments' page (see previous section for a walkthrough of Finding your Appointment.)
- Click on the appointment you would like to attach a document to.
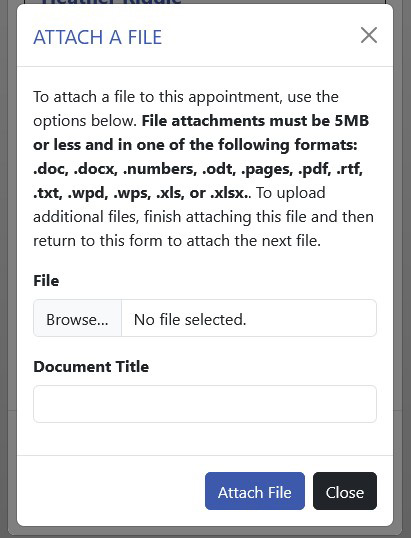
- On the 'Existing Appointment' window, click the yellow 'Attach File' button.
- Click in the empty box underneath the section labeled ‘File’ and to the right of a ‘Browse’ or ‘Choose File’ button.
- An external browsing window should pop up allowing you to find a file on your computer or device (the look and behavior of this window will vary depending on what operating system you are using).
- Navigate to the file that you would like to upload and select it.
- The box under ‘File’ should now show the name of the file you attached. Confirm it is the right one.
- Click in the ‘Document Title’ box and give your document a title.
- When you are ready scroll to the bottom of the window and click the ‘Attach File’ button.
- If you are still in the ‘Create Appointment’ window, or you are in the ‘Edit Appointment’ window:
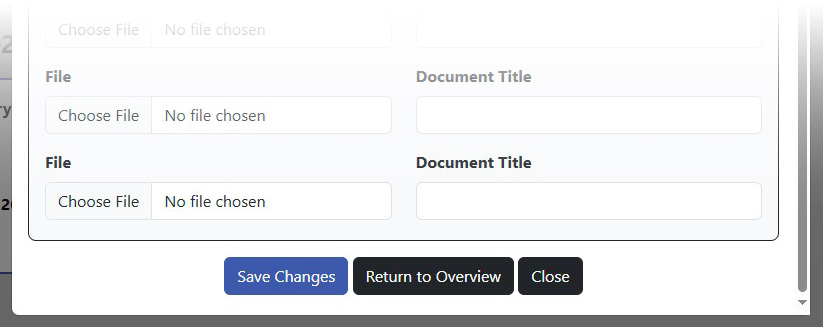
- Find the ‘File Attachments’ section toward the bottom of the Appointment window.
- Click in any of the 3 boxes labeled ‘File’ with a ‘Browse’ or ‘Choose File’ button underneath.
- An external browsing window should pop up allowing you to find a file on your computer or device (the look and behavior of this window will vary depending on what operating system or device you are using).
- Navigate to the file that you would like to upload and select it.
- The box under ‘File’ should now show the name of the file you attached. Confirm it is the right one.
- Click in the ‘Document Title’ box and give your document a title.
- Once you have attached all the documents that you needed, scroll to the bottom of the window and click the ‘Save Changes’ button.
- You may now close out of WCOnline.
Note: Uploading a file is completely optional! If your appointment is with a tutor in person, you can bring a hard copy of your document and any relevant information with you to the appointment. If your appointment is online, there is actually a separate way to upload your document detailed in the 'Join an Online Appointment' section.
Join an Online Appointment
- Ten minutes before your appointment, log into the appointment system at utsa.mywconline.com.
- Click on the 'My Appointments' tab in the top left side of the navbar. (For a detailed walkthrough, go to the 'Find and Edit your Appointment' section of the guide.)
- Find and click on the Online appointment you would like to join.
- In the center of the 'Existing Appointment' window, there should be a box labeled 'Online' that has a red outline around it.
- Inside the 'Online' box, there is a red button labeled 'Start or Join Online Consultation'. Click it.
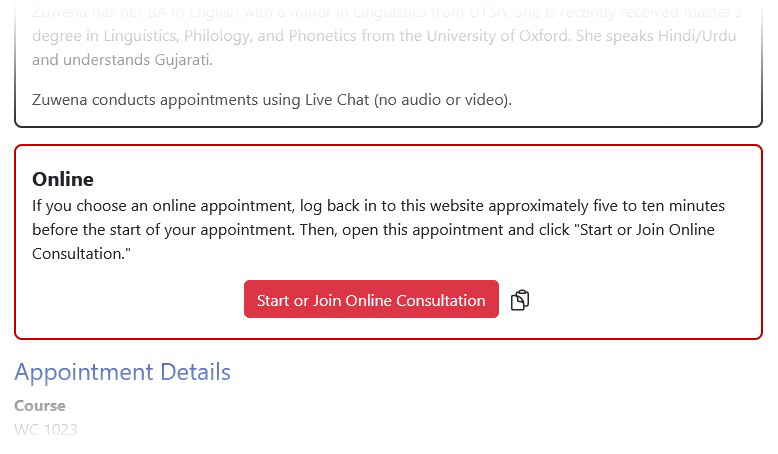
- This will open the appointment window where you will be meeting with your tutor.
- Read the instructions present in the main window to learn what all you will be able to do during your online consultation.
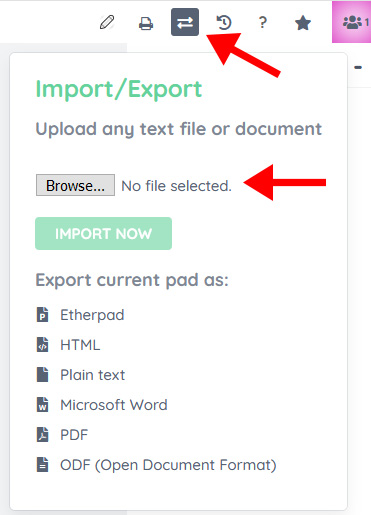
- To upload your essay:
- Click on the 'Import/Export' button in the top right cornerbottom left of the page.
- From the drop-down box, click on the 'Browse' button and navigate to the file location of your essay on your device.
- Click 'Open' on the file browser window.
- Click on the 'Import Now' button.
- Your essay will now appear in the main window.
Note: Depending on the type of session your tutor has set up, and what your preferred method of communication is, you can interact with your tutor during an online appointment either by voice with a microphone or by text chatting in the text box at the bottom right-hand side of the window.
Join the Waiting List
If none of the suggested 'Close Match' times work for you, you can place your name on our waiting list to be notified of a cancellation.
- After searching for an appointment, there should be a blue 'Waiting List' button at the top right-hand side of the search area.
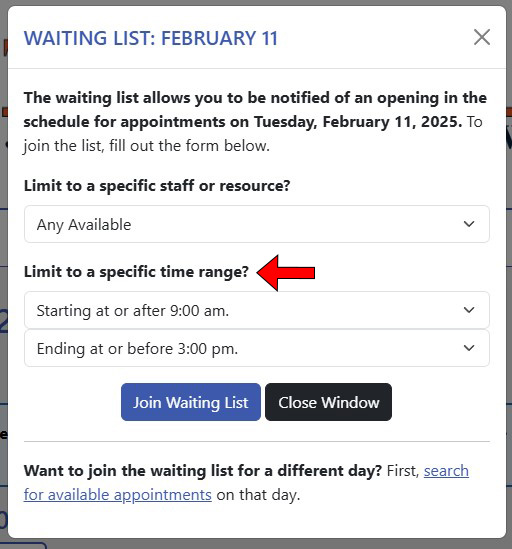
- Click on the 'Waiting List' button and a new window will open.
- If you are looking for an appointment with a specific tutor, click on the drop-down box under the field 'Limit to a specific staff or resource' and choose the tutor you would like to see.
- If you are only available during a certain time period, adjust the time limit fields under the 'Limit to a specific time range' field.
- Click the blue 'Join Waiting List' button.
- Whenever someone cancels an appointment during the day and time you have specified, you will receive an email notification of the cancellation. In the event there are multiple people waiting for the same time slot, it will be first-come, first-served.
Note: If you wish to add yourself to the waiting list for several different days, you will need to repeat the above steps for each day.
Cancel an Appointment
- Log into the appointment system at utsa.mywconline.com.
- Click on the 'My Appointments' tab in the navigation panel and select the appointment you wish to cancel.
- Scroll to the bottom of the 'Existing Appointment' window and click on the red 'Cancel Appointment' button.
- Confirm that you would like to cancel your appointment.
- Refresh your 'My Appointments' page and verify that the appointment has been removed.
- You may now close out of the WCOnline appointment system.